Home
| Home | Cavernosa |
| PyGLUT | Blender |
| Links |
| My Site |
| Intro |
| Cavernosa |
| PyGLUT |
| Blender |
| Links |
| Cavernosa |
| Intro |
| Instructions |
| Gallery |
| Screenshots |
| Download |
| Email me |
|
|
 |
|
|
Cavernosa Instructions
Contents
- To Run Cavernosa
- To Use Cavernosa
- Side Panel
- Dialogues
- Display Options !!! Empty for now !!!
- Physics Dialogue
- Control Dialogue !!! Empty for now !!!
To Run Cavernosa
You can use it via it's GLOW GUI; Cavernosa.exe.
To Use Cavernosa
As it is basicaly a sketching program with 2d pixels extended into 3d voxels, using Cavernosa requires you to learn to fly through the 3d grid that is it's medium.There are also 2 key points which must be controled. The focus point is where you can add or remove material and is always dead-ahead of the viewpoint at a varying distance (the distance is what you control). The rotation point is at some offset beyond the focus point or coincident with it. It is represented on-screen by four red lines. As they radiate out and upwards, they can be used to tell which way is up if you get disoriented. You are able to circle the rotation point, simply to get around or with the focus point between you and it, to achieve the same coiling effect that is used to construct clay pots. This all entails a fairly complex control system organised around 4 pairs of keys, each of which affects the action of mouse movements.
The Key pairs are:
- f & v (camera relative movement):
- f: mouse look (rotates the camera around the viewpoint).
- v: forward/back & left/right.
- f&v: up/down & twist about camera z-axis (if anti-twist is disabled).
- d & c (plane locked translation):
- d: forwards/back & left/right in the plane perpendicular to the grid axis closest to the camera up vector.
- c: up/down & left/right in the plane perpendicular to grid axis closest to camera forwards vector.
- d&c: up/down & left/right in the plane perpendicular to the grid axis closest to the camera right vector.
- s & x (circling the rotation point):
- s: up/down & left/right around the rotation point, using the grid axis closest to the camera up vector as the rotation axis.
- x: up/down & left/right around the rotation point, using the grid axis closest to the camera forwards vector as the rotation axis.
- s&x: Nothing for now.
- a & z (moving the two key points):
- a: rotation point away/towards focus point & left/right translate (pointless and often slightly annoying).
- z: focus point away/towards view point & left/right translate (pointlessly).
- a&z: viewpoint and focus point together away/towards the rotation point, leaving it where it is & left/right translate (pointlessly).
The left and right mouse buttons add the current tool bit (a preview of which is drawn in green wireframe at the focus point) to the grid or subtract it respectively. Some of the smaller tools can not be used to add voxels except to fill in spaces between other voxels. They are still useful to remove voxels.
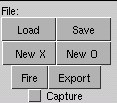
The Side Panel:
| File Group | ||
 |
|
|
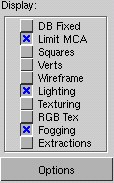
| Display Group | ||
 |
|
|
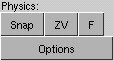
| Physics Group | ||
 |
|
|
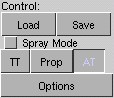
| Control Group | ||
 |
|
|
| Bit 'N Bobs Group | ||
 |
! These buttons and dialogues thrown up by them are pressed at the user's own risk ! Any or none of this stuff could be here and may or may not be connected up to functional code in released versions. |
Dialogues
- Display Options !!! Under Construction !!!
- Physics Dialogue
- Control Dialogue !!! Under Construction !!!
Special Keys Used When Running From The Python Interpreter
- p: Saves the current grid to Test.vox
- o: Loads the current grid from Test.vox
- u: New solid grid.
- i: New clear grid.
- q: Toggles movement mode.
- e: Changes tool bit.
- 3-7: Set new grid level.
- Check Cavernosa.py for any others.
The Blender GUI:
(for the first release of Cavernosa only)
The side panel widgets are broken up into several groups:
- Resize This:
- PH: Slider that controls the width of the side panel.
- BH: Slider that controls the height of the side panel buttons.
- Display:
- F: Fog On/Off toggle.
- W: Wireframe/Solid grid toggle.
- DB: Display Box stick/follow-focus toggle. (The display box is the volume of the grid which is actualy rendered or output on export. It has two modes: a) follow the focus; b) stay where it is. The second mode is useful if you want to be sure how large the sculpture you are making is or if you want to take a look at a part of it from a distance.)
- T: Twist Compensation On/Off toggle. (Helps to draw straight lines with the plane locked translators and avoid disorientation among other uses.)
- A: Author credit On/Off toggle.
- R: Rendering toggle. Disables the display loop and allows you to read the tool tip messages for the widgets. Once released, this button is reluctant to be pressed again. Clicking around on other buttons or restarting the script is nescessary to make it depress.
- Count Faces: Print the number of grid faces in the display box to std::cout. As blender has a 64k vertex limit at the moment and I don't remove duplicate verts yet, the limit for exporting is about 16k faces.
- Display Box:
- x: X dimension of grid display box. Click on it and drag left or right to change the value.
- y: Y dimension of grid display box. Click on it and drag left or right to change the value.
- z: Z dimension of grid display box. Click on it and drag left or right to change the value.
- Control:
- Sensitivity: Mouse motion is scaled by this value. Useful to set low when doing detailed work in direct control movement mode (see below).
- Proportional/Direct: Movement mode. In proportional mode the offset of the mouse cursor from the center of the the viewport is proportional to the magnitude of the resulting motion. In direct mode the motion of the mouse is tranlated directly into movement.
- Change Affector: Rotates through the available affectors or 'tool bits'. The current tool tip can be seen in the 3d view as a green wireframe.
- Export:
- Dimension: Largest dimension of the the bounding box of the resulting Blender mesh. The display box contents will be scaled to fit. Click and drag left or right to change.
- Mesh: An input edit box to set the name that will be given to the mesh in Blender.
- To Mesh: Export the current display box contents to the named Blender mesh.
- Save/Load:
- File: Input edit box used to set the filename used for saving and loading.
- Save: Save the voxel grid to the file named above.
- Load: Attempt to load the voxel grid from the file named above.
- New Grid: Replace the current grid with a new, empty one.
- New Grid Levels: Set the number of levels the new grid will have.
3 levels equates to a grid of 512 x 512 x 512 voxels.
4 levels equates to a grid of 4096 x 4096 x 4096 voxels.
5 levels equates to a grid of 32768 x 32768 x 32768 voxels.
6 levels equates to a grid of 262'144 x 262'144 x 262'144 voxels.
7 levels equates to a grid of 2'097'152 x 2'097'152 x 2'097'152 voxels.
8 levels equates to a grid of 16'777'216 x 16'777'216 x 16'777'216 voxels.
- Quit: Close down the GUI.
If you find this explanation confusing you are welcome to email me with your queries.